This how-to illustrates adding a process for availability monitoring. We add and create a fake process, which assists in understanding and testing purposes. You can then extend this how-to to work for any real processes on your systems.
Overview
- Prep Environment
- Start process running
- Manually add process to Zenoss
- Remodel Device
- Check for process in Zenoss
- Test that monitoring works
- Lock the process
Notes
Assumptions:
- You have a device with working SNMP connections to Zenoss.
Check default processes
First, check to make sure that your process is not monitored by default. Some common processes such as httpd and mysql may be monitored out of the box. You can also look at the properties of these pre-existing processes for more advanced Regex examples.
- Navigate to the device
- Click on the ‘OS’ tab
- Inside the ‘OS Processes’ table, uncheck the ‘Monitored’ box
- Wait for a refresh and see if your process is now listed.
Case Sensitive
Many processes added are often case sensitive, especially on unix systems. Regex fields are case-sensitive by default.
Prep Environment
You can do this with a real process, but also with a fake one that we will create. A fake one allows us to play and test easily.
It is a good practice to assure that you are authenticated as ‘zenoss’ user.
su - zenoss
Create process
Create a text file called fred, or whatever you want, to become a shell script that will run for a while in the background. Inside it will be a shell command such as sleep. Make sure it has executability via chmod command.
echo "sleep 500" > fred
chmod 755 fred
Run process
Go ahead and start that shell script. You can do it in the current screen like so:
sh fred
or in the background:
sh fred &
I found it easier to run two shells, one being a shell that ran the test process in the foreground and that I could easily stop it with Ctl+c. A second shell allows you to watch the process, or do any other commands needed.
See process locally
ps ax | grep fred
27577 pts/0    S+     0:00 sh fred
27683 pts/1    S+     0:00 grep fred
You should get back a fred process in addition to the grep that was running as you ran grep. In this case, “sh fred”. This means, for sure, our process is running.
Manually add process to Zenoss
Back to the Zenoss GUI.
- In the left-hand menu, under ‘Classes’, click ‘Processes’
- Under the table menu for ‘Processes’, click ‘Add Process...’
- Type in the process name. Often, it is useful to type in the Regex name that you will use to match the process.
- We will simply enter “fred”, in our case
- Case Sensitive: Note that processes added are often case sensitive, especially on unix systems
- You can mess with the added processes details by clicking the new process ‘fred’
- ‘Edit’ and ‘zProperties’ tabs contain useful stuff, most importantly the Regex field
- In this case, we shouldn’t have to muck with anything


Remodel device
This is a necessary step that is often forgot. Remodeling will eventually automatically happen on all devices, usually every 12 hours, but we want to see its effects now.
- Navigate to the device you are running ‘fred’ on
- Under the page menu for the device, click ‘Manage’ > ‘Model Device’
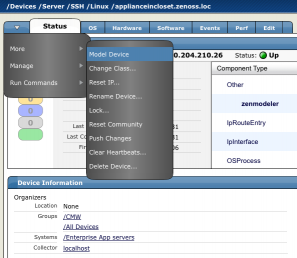
- Re-modeling now occurs and gives a log
- When a device is modeled, all processes setup in zenoss are checked for by the zenprocess daemon

Check for process in Zenoss
Note: See get_faster_results_when_testing to see effects faster
- Navigate to the device you are running ‘fred’ on
- Click on the ‘OS’ tab
- Look for “/fred” under ‘OS Processes’ table.
- Since you are running the ‘fake’ fred in a shell (you are, right?), the entry for “/fred” should have a green ‘Status’ dot.
- The Name field, may be something other than fred. Like “sh fred” or “sh /home/zenoss/fred”. This is what the Regex matches do.

Didnt show?
If the process is not there, something went wrong above
- make sure you are viewing the correct device
- try deleting and re-doing all of the above steps
- make sure SNMP is in fact working on that device
Trouble shoot with the following manual, 1-run daemon command:
zenprocess run -v10 -d applianceincloset.loc
- -v is verbose logging to screen
- -d defines the device to run zenprocess on. Where applianceincloset.loc was the name of my device. Use the full device name of your device.
The zenprocess command runs on your device and gives heavy log text back that can be useful. The log you get back for a working device, differs from a non-existent or non-working device. Try running it on a working device and compare to your non-working device.
Pay special attention to
INFO:zen.zenprocess:Pulled process status for 1 devices and 3 processes
Vs
INFO:zen.zenprocess:Pulled process status for 0 devices and 0 processes
Either instance of the above log tells us different things. The first one has found the device specified, and found 3 processes on the device. The second one, it didnt even find the device, something more fundamental is going wrong. Maybe you are not referencing the device name correctly in your zenprocess command, or the device is not responding.
Test that monitoring works
- Verify that the fred process is still running
- Verify that the status dot for “/fred” is still green
- Manually stop the process
- If you are running in foreground, hit Ctrl+c
- If running in background:
[zenoss@applianceincloset ~]$ ps ax | grep fred
28538 pts/0    S      0:00 sh fred
28542 pts/0    S+     0:00 grep fred
[zenoss@applianceincloset ~]$ kill 28538
[1]+  Terminated              sh fred
- Go see if the process status dot has changed Red
- Also expect to receive an event on the ‘Events’ tab
- Note: you may need to wait some time (5+ minutes) for this to happen. See get_faster_results_when_testing to see effects faster
- Do the same process as above, but bring the process back up
- This time, the error event should clear, and there should be no active events for the process

Lock the process
When Zenoss models a device (every 12 hours by default), it looks to see which processes it should be monitoring. If it does not see a process existing while it models, that process will no longer be monitored. You need to explicitly tell Zenoss to Lock a process from being removed on modeling. This is called locking the process from updates.
- Navigate to the ‘OS’ tab of the device with the process you are monitoring
- Find the running process under ‘OS Processes’ and click the check mark to select that process
- Click the drop down table-menu next to OS Processes > Lock OS Processes
- Select ‘Lock from deletion and updates’ button
- Notice the new icons to the far right of your process
