Testing SATA drives
Test EVMS / LVM2 HDDs setup works
GUI boot problem on Ubuntu 7.04 -> 7.10
Get EVMS SATA HDDs working simultaneously
Installed EVMS on Ubuntu 7.10
Boot doesnt find /root HDD
Fixed GUI boot problem
No SATA
Unsuccessful 8.04 Install
Need to return 1TB Best Buy HDD
Tried to transfer
Installed temp winXP
Wrote plans
Successful 8.04 install
Get SATA to work on 8.04
Get EVMS to work on 8.04
Download packages
Patch, config, build custom kernel
Build and install EVMS tools 2.6.26.3
Activate EVMS volumes
Mount LVM2 drive
No Success
Ideas, regroup, rethink
Tried EVMS on "original" 7.04 clean
No Success
RAID-5 with 3x 1TB drives
Initialize disks
Create raid disk array
setup and create file system
NFS Share
Little success, fuck it
Still want to measure speed
Bittorrent and Large RAID test files downloaded
AFP and Avahi for Apple filesharing
Instructions modified from:
Install Netatalk
- Netatalk install
sudo apt-get install netatalk
- I used to have to install this manually because it did not formerly come with the correct crypto options. Now, this is included in the latest netatalk install. Info from here.
- Setting up netatalk (2.2~beta4-1) ...
Config Netatalk (AFP)
- Which daemons to run?
- edited /etc/default/netatalk
        ATALKD_RUN=no
        PAPD_RUN=no
        CNID_METAD_RUN=yes
        AFPD_RUN=yes
        TIMELORD_RUN=no
        A2BOOT_RUN=no
- Set various settings for afp daemon
- edited /etc/netatalk/afpd.conf
- -transall -uamlist uams_randnum.so,uams_dhx.so,uams_dhx2.so -savepassword -advertise_ssh- - says that this line applies to the default afpd server; you could, optionally, have more than one, with names in place of this dash
- -transall uses all protocols, tcp, udp, ddp (could also optionally choose any one or mix of these)
- -uamlist sets user auth modules to use; uams_dhx2.so is needed for OSX Lion
- -savepassword allows clients to save the pass locally; can also be -nosavepassword
- -advertise_ssh allows afp encrypted and sent over a ssh session; assumes sshd is setup and running correctly; not advised by netatalk docs
Config Shared Volumes
- Set what to share and to whom
- edited /etc/netatalk/AppleVolumes.default
/media/documents LinuxMediaServer allow:nyeates,shyeates,shyeates513 cnidscheme:cdb options:usedots,upriv- allow: usernames that can login to the afp server; needs to be defined users I think
- cnidscheme: use dbd; cdb doesnt work anymore on netatalk 2.1+
- options: usedots: allow proper .blah files; upriv: afp3 unix privs - do not use if you have OS X tiger
- Restarted Apple Files Server
sudo /etc/init.d/netatalk restart
- Test connectivity
- Go over to mac computer on same network
- In finder, hit Ctrl+K
- Type in “afp://lms” and hit connect
- lms is the dns name of my server; could also use IP address
- Type in auth info - user and pass
- It should load and show mount options (if more than one mount was defined in AppleVolumes.default)
- Files and directories should load and show
Install Avahi (Bonjour)
- Avahi install
sudo apt-get install avahi-daemon
- Other needed package??
sudo apt-get install libnss-mdns
- both already installed !!
- edited /etc/nsswitch.conf
- added “mdns” to “hosts:” line
hosts: files mdns4_minimal [NOTFOUND=return] dns mdns4 mdns
Config Avahi and advertise services
- edited /etc/avahi/services/afpd.service
- inserted XML: “port 548”
        <?xml version="1.0" standalone='no'?><!--*-nxml-*-->
        <!DOCTYPE service-group SYSTEM "avahi-service.dtd">
        <service-group>
        <name replace-wildcards="yes">%h</name>
        <service>
        <type>_afpovertcp._tcp</type>
        <port>548</port>
        </service>
        <service>
        <type>_device-info._tcp</type>
        <port>0</port>
        <txt-record>model=Xserve</txt-record>
        </service>
        </service-group>
- Restarted Avahi Daemon
sudo /etc/init.d/avahi-daemon restart
sudo restart avahi-daemon
Test on Macs
Worked Perfect!
2-2.5 MBps transfers! Yay
RAID monitor commands
Install email MTA (postfix? mailx?)
Network issue
Mess with lms
Mess with macmini
Gave up for now
Bad Shutdown??
More mess with lms
Solution: turn off static NAS on router
VNC setup
Snort Install
Open SSH install
Zenoss install
Device population
SNMP install
Server slowness
Retry to recover 2x 320 GB HDDs
Review and learning - dd fdisk cmds
Test Bitwise Copy
Test DD run
as root:
- what size bs= to use? 1024k?
- everyone uses 1024 (1MB) in disk copy
- dd if=/dev/sdd of=/media/documents/Backups/lms_Ubuntu_804_evms_kernel.img bs=1024k
- in top, shows large CPU wait(wa) and system (sy)
- also dd and md0_raid5 and kswapd0 are using most CPU
- wanted to see progress of copy process. Quit top and listed the file being copied to, to see its size:
- ls -la /media/documents/Backups/
- gave file size: 7849639936 (7.8 GB)
- finished! at about 10:40 = 8 mins for 10 GB
- DONT FORGET TO MAKE BACKUP READ-ONLY
Test fdisk
- fdisk is supposed to show the format of a disk in some way, showing partitions and formats of each
- Got some interseting results when comparing fdisk results of normal disk and dd’d copy of a disk:
root@lms:/home/nyeates1# fdisk -l /dev/sdd
Disk /dev/sdd: 10.2 GB, 10245537792 bytes
255 heads, 63 sectors/track, 1245 cylinders
Units = cylinders of 16065 * 512 = 8225280 bytes
Disk identifier: 0x3b14a989

   Device Boot      Start         End      Blocks   Id  System
/dev/sdd1   *           1        1186     9526513   83  Linux
/dev/sdd2            1187        1245      473917    5  Extended
/dev/sdd5            1187        1245      473886   82  Linux swap / Solaris
root@lms:/home/nyeates1#
root@lms:/home/nyeates1#
root@lms:/home/nyeates1# fdisk -l /media/documents/Backups/lms_Ubuntu_804_evms_kernel.img
You must set cylinders.
You can do this from the extra functions menu.

Disk /media/documents/Backups/lms_Ubuntu_804_evms_kernel.img: 0 MB, 0 bytes
255 heads, 63 sectors/track, 0 cylinders
Units = cylinders of 16065 * 512 = 8225280 bytes
Disk identifier: 0x3b14a989

                                                  Device Boot      Start         End      Blocks   Id  System
/media/documents/Backups/lms_Ubuntu_804_evms_kernel.img1   *           1        1186     9526513   83  Linux
Partition 1 has different physical/logical endings:
     phys=(1023, 254, 63) logical=(1185, 254, 63)
/media/documents/Backups/lms_Ubuntu_804_evms_kernel.img2            1187        1245      473917    5  Extended
Partition 2 has different physical/logical beginnings (non-Linux?):
     phys=(1023, 254, 63) logical=(1186, 0, 1)
Partition 2 has different physical/logical endings:
     phys=(1023, 254, 63) logical=(1244, 254, 63)
/media/documents/Backups/lms_Ubuntu_804_evms_kernel.img5            1187        1245      473886   82  Linux swap / Solaris
- This could have something to do with this text from fdisks man page. I am thinking that because the image is on another disk, it is not matching up between the two disks...also problem with cylinder not being set, as seen above.
       Whenever a partition table is printed out, a consistency check is performed on the partition table entries.  This
       check verifies that the physical and logical start and end points are identical, and that  the  partition  starts
       and ends on a cylinder boundary (except for the first partition).
- Looked up some info as to why and how to set cylinders
- tried fdisk -lu /media/documents/Backups/lms_Ubuntu_804_evms_kernel.img which lists in sectors instead of cylinders
- No difference
- Decided to run fdisk normally to pretend like i am formatting the disk
- fdisk /media/documents/Backups/lms_Ubuntu_804_evms_kernel.img
- brings to fdisk promt and I hit ‘h’ for help and see extras menu! (expert it says)
- hit x for extras, c for cylinders
- entered 1245 cylinders (from original disk)
- hit w to write out the changes, got back this error:
Expert command (m for help): w
The partition table has been altered!

Calling ioctl() to re-read partition table.

WARNING: Re-reading the partition table failed with error 25: Inappropriate ioctl for device.
The kernel still uses the old table.
The new table will be used at the next reboot.
Syncing disks.
- ran another fdisk -l and it gave same results as above
- did not definitively find out what all the above means and what the errors are
- deleted 10 GB test file from RAID-5
Production Bitwise Copy
Have decided that I will now go ahead with bitwise copy of 2x 320 GB PATA drives.
- Shutdown server
- Power off (dont want no sparks flying like long time back!)
- Plug-in PATA drives
- Reboot
Do PATA drives work?
- See if the PATA drives show as devices, at the least
ls sd*
sda  sda1  sdb  sdb1  sdc  sdc1  sdd  sdd1  sdd2  sdd5  sde  sdf
- sde and sdf may be new ones?? YES, they are
- Want to see status or looks of PATA disks to the OS, so ran a few commands to show what it thinks
- fdisk -l
Disk /dev/sda: 1000.2 GB, 1000204886016 bytes
255 heads, 63 sectors/track, 121601 cylinders
Units = cylinders of 16065 * 512 = 8225280 bytes
Disk identifier: 0x860fdec6

   Device Boot      Start         End      Blocks   Id  System
/dev/sda1               1      121601   976760001   fd  Linux raid autodetect

Disk /dev/sdb: 1000.2 GB, 1000204886016 bytes
255 heads, 63 sectors/track, 121601 cylinders
Units = cylinders of 16065 * 512 = 8225280 bytes
Disk identifier: 0x00000000

   Device Boot      Start         End      Blocks   Id  System
/dev/sdb1   *           1      121601   976760001   fd  Linux raid autodetect

Disk /dev/sdc: 1000.2 GB, 1000204886016 bytes
255 heads, 63 sectors/track, 121601 cylinders
Units = cylinders of 16065 * 512 = 8225280 bytes
Disk identifier: 0x0008bc1e

   Device Boot      Start         End      Blocks   Id  System
/dev/sdc1               1      121601   976760001   fd  Linux raid autodetect

Disk /dev/sdd: 10.2 GB, 10245537792 bytes
255 heads, 63 sectors/track, 1245 cylinders
Units = cylinders of 16065 * 512 = 8225280 bytes
Disk identifier: 0x3b14a989

   Device Boot      Start         End      Blocks   Id  System
/dev/sdd1   *           1        1186     9526513   83  Linux
/dev/sdd2            1187        1245      473917    5  Extended
/dev/sdd5            1187        1245      473886   82  Linux swap / Solaris

Disk /dev/sde: 320.0 GB, 320072933376 bytes
255 heads, 63 sectors/track, 38913 cylinders
Units = cylinders of 16065 * 512 = 8225280 bytes
Disk identifier: 0x39713970

   Device Boot      Start         End      Blocks   Id  System

Disk /dev/sdf: 320.0 GB, 320072933376 bytes
255 heads, 63 sectors/track, 38913 cylinders
Units = cylinders of 16065 * 512 = 8225280 bytes
Disk identifier: 0x39713971

   Device Boot      Start         End      Blocks   Id  System

Disk /dev/md0: 2000.4 GB, 2000404348928 bytes
2 heads, 4 sectors/track, 488379968 cylinders
Units = cylinders of 8 * 512 = 4096 bytes
Disk identifier: 0x00000000

Disk /dev/md0 doesn't contain a valid partition table
- pvscan
  PV /dev/sdf   VG Media   lvm2 [298.06 GB / 0    free]
  PV /dev/sde   VG Media   lvm2 [298.06 GB / 0    free]
  Total: 2 [596.12 GB] / in use: 2 [596.12 GB] / in no VG: 0 [0   ]
- Why pvscan shows the PATA drives only, and not others, and why it says the are VG Media (Volume Group?) and lvm2 format, while fdisk shows nothing.... I am unsure
- man pvscan says
- “pvscan scans all supported LVM block devices in the system for physical volumes.”
- “SEE ALSO lvm(8), pvcreate(8), pvdisplay(8)”
- I am thinking that maybe EVMS really did this all in LVM(2?) standard ways and could maybe use those commands to try to create a physical volume of those two disks, etc
DD Run
as root:
- dd if=/dev/sdf of=/media/documents/Backups/lms_pata_320GB_sdf.img bs=1024k
305245 1 records in
305245 1 records out
320072933376 bytes (320 GB) copied, 6398.41 s, 50.0 MB/s
- started ~ 2:22am
- should take about 8min/10GB; 640GB/10GB = 64; 64 * 8min = 512 mins = 8 hours to transfer both disks!? wowzers
- I will have to do this in two sittings and babysit it. Should have done it in a screen session
- though I can still login remote and look at sizes of the .img file I am creating
- finished in ~1:45 mins
- REMEMBER TO SET BACKUPS AS READ-ONLY
- sudo chmod 444 lms_pata_320GB_sdf.img
- dd if=/dev/sde of=/media/documents/Backups/lms_pata_320GB_sde.img bs=1024k
305245 1 records in
305245 1 records out
320072933376 bytes (320 GB) copied, 6559.71 s, 48.8 MB/s
- started 4:24
- sudo chmod 444 lms_pata_320GB_sde.img
- Oddly noticed file-size differences on the original sdf file:
-rw-r--r--  1 root     nyeates1 233G 2009-08-03 03:38 lms_pata_320GB_sdf.img
ls -lah /media/documents/Backups/
-rw-r--r--  1 root     nyeates1 299G 2009-08-03 04:06 lms_pata_320GB_sdf.img
nyeates1@lms:~$ cd /media/documents/Backups/
nyeates1@lms:/media/documents/Backups$ sudo chmod 444 lms_pata_320GB_sdf.img
[sudo] password for nyeates1:
nyeates1@lms:/media/documents/Backups$ ls -lah /media/documents/Backups/
-r--r--r--  1 root     nyeates1 299G 2009-08-03 04:06 lms_pata_320GB_sdf.img
- Oddly also is that the other file was always listed as 299G
- Restarted thinking I would unplug the HDDs; decided against it, plugged em back in; I might try to mount em at work with those pv commands
- Ran ‘screen’ so I could see same commands at work as at home
Try to mount 320GB disks - from pvscan cmd
- I am thinking that because of what I saw from the output of the pvscan command before, that something knows about what is behind these disks. Maybe, just maybe I can combine them (LVM) and mount them by command line.
- Ran the following common LVM commands to get info:
root@lms:~# pvscan
  PV /dev/sdc   VG Media   lvm2 [298.06 GB / 0    free]
  PV /dev/sdb   VG Media   lvm2 [298.06 GB / 0    free]
  Total: 2 [596.12 GB] / in use: 2 [596.12 GB] / in no VG: 0 [0   ]
root@lms:~#
root@lms:~# pvdisplay
  --- Physical volume ---
  PV Name               /dev/sdc
  VG Name               Media
  PV Size               298.09 GB / not usable 29.34 MB
  Allocatable           yes (but full)
  PE Size (KByte)       32768
  Total PE              9538
  Free PE               0
  Allocated PE          9538
  PV UUID               L5MYAm-YTkK-WXJn-3Y8N-I04A-sKzc-SoJcUM

  --- Physical volume ---
  PV Name               /dev/sdb
  VG Name               Media
  PV Size               298.09 GB / not usable 29.34 MB
  Allocatable           yes (but full)
  PE Size (KByte)       32768
  Total PE              9538
  Free PE               0
  Allocated PE          9538
  PV UUID               qgw2Hv-ssfb-7g7G-jqXd-1TeQ-erKc-1B2PtT

root@lms:~#
root@lms:~# vgdisplay
  --- Volume group ---
  VG Name               Media
  System ID
  Format                lvm2
  Metadata Areas        2
  Metadata Sequence No  12
  VG Access             read/write
  VG Status             resizable
  MAX LV                256
  Cur LV                1
  Open LV               0
  Max PV                256
  Cur PV                2
  Act PV                2
  VG Size               596.12 GB
  PE Size               32.00 MB
  Total PE              19076
  Alloc PE / Size       19076 / 596.12 GB
  Free  PE / Size       0 / 0
  VG UUID               MV2Hm7-NZ7O-drJ6-tDfe-TXhS-VHS1-ekqx38

root@lms:~#
root@lms:~# lvdisplay
  --- Logical volume ---
  LV Name                /dev/Media/CargoPlane
  VG Name                Media
  LV UUID                xwvmre-dhz6-cQ7L-rBLt-knUw-Q1NB-ZqMqVK
  LV Write Access        read/write
  LV Status              available
  # open                 0
  LV Size                596.12 GB
  Current LE             19076
  Segments               2
  Allocation             inherit
  Read ahead sectors     0
  Block device           253:0

root@lms:~# vgscan
  Reading all physical volumes.  This may take a while...
  Found volume group "Media" using metadata type lvm2
- Activated the existing Volume Group:
root@lms:~# vgchange -a y
  1 logical volume(s) in volume group "Media" now active
- Saw in file listings of /dev/Media/ and /dev/mapper/ that devices existed!
- Mounted that beeeootch!
root@lms:/dev/mapper# mkdir /media/olddocuments
root@lms:/dev/mapper# mount -t ext3 /dev/Media/CargoPlane /media/olddocuments/
- Went to the directory and the structure is all there! YEEEEHAWWW! Fuckin A. 1.5 yrs in the fixing.
- Got some of my solution here:
Copy stuff over
- screen to get a screen going, and then ctrl a d out to disconnect but leave it open. now i can connect to same screen from work and abroad by screen -x
- cd /media/olddocuments/videos
- cp -r . /media/documents/Videos/
- saw that directories and files i brought over were owned and grouped to root. All my files are nyeates1
- sudo chown -Rv nyeates1 .
- chgrp -Rv nyeates1 .
- found out i had like 3 screens inside of each other; need to keep better track of them
- screen ; can press backspace to tell if u are in a screen or not; screen blinks whole screen; normal makes beep and no blink
- mv -v ./porn/* ./pron/
- rmdir porn/
- finished copying, sorting, and permissioning in visual file explorer
- ALL DOCS FROM OLD LVM ARRAY ARE OVER YAY!!!
Check LVM 320GB array with smartctl fsck or bonnie
- read about bonnie , had a hard time reading its homepage and figuring what it was
- smartmon seemed simpler and i got command lines off the bat
- screen -x
- su -
apt-get install smartmontools
- saw that 320GB drives are /dev/sdc and b
# smartctl -i /dev/sdc

smartctl version 5.37 [x86_64-unknown-linux-gnu] Copyright (C) 2002-6 Bruce Allen
Home page is http://smartmontools.sourceforge.net/

=== START OF INFORMATION SECTION ===
Model Family:     Western Digital Caviar SE family
Device Model:     WDC WD3200JB-00KFA0
Serial Number:    WD-WCAMR2482097
Firmware Version: 08.05J08
User Capacity:    320,072,933,376 bytes
Device is:        In smartctl database [for details use: -P show]
ATA Version is:   6
ATA Standard is:  Exact ATA specification draft version not indicated
Local Time is:    Wed Aug  5 02:43:48 2009 EDT
SMART support is: Available - device has SMART capability.
SMART support is: Enabled
- smartctl -d ata -H /dev/sdb and c both PASSED
smartctl -d ata -a /dev/sdc
- above useful for getting general stats on drive
- ran initial smartctl -a on all data disks. Got PASSED for all, though I bet they have never run a full test
- ran detailed test on sdc
smartctl -d ata -t long /dev/sdc
- took a few hrs to run? got:
- Test looked good:
smartctl -l selftest /dev/sdc
SMART Self-test log structure revision number 1
Num  Test_Description    Status                  Remaining  LifeTime(hours)  LBA_of_first_error
# 1  Extended offline    Completed without error       00%     10766         -
- Test on other sdb is weird; it keeps getting canceled or something; I ran the long test as -C mode and normal mode and both seemed to fail on sdb
# 1  Extended offline    Completed without error       00%     11043         -
# 2  Extended captive    Interrupted (host reset)      90%     11040         -
- Saw file system check command in book ‘how linux works’, want to give it a try
- First though the book says I need to unmount the filesystem. Also it is good to know what filesystem you have (ext2, ext3, reiser, etc). I could not find this anywhere in past vgdisplay, etc commands. I must have guessed at ext3 when i mounted!
umount /dev/Media/CargoPlane
- ls /media/olddocuments/ returned back nothing; Good its unmounted!\
fsck /dev/Media/CargoPlane
- went fine; apparently no need to worry about (14.7% non-contiguous)
RAID tests
Now that I have all of the old LVM data over on the production RAID (3x 1TB in RAID-5), I can focus my efforts on the production RAID and a new OS setup. First, I need to understand how to test, use, and fix RAID in case anything needs to change or something bad happens. I also had originally wanted to do these tests before implementing RAID, in order to make sure that it was a good decision. I skipped it tho, not having time, and now I will return to it.
I need to test important use cases like if I want to expand to another hard drive in the array, will it do this with ease and the data is safe? Also, if i want to switch OS distributions, will I be able to mount it? Another is error testing, what if one drive goes down, how do I repair?
See my list of RAID tests at: raid_test
Prep for tests
Setup 3rd 320GB disk in LMS machine
- ‘shutdown now’ from within screen at work
- came home and machine is still running
- couldnt see screen but it was just dim from gopher hunting
- turned of machine power
- plugged in 320GB ‘transit2’ drive that has backdup XP stuff on it (that is how it is labeled)
- booted up and couldnt find it at first
- had to put HDD pin in as slave drive. Likely root drive has pin set as master drive?
- got it to boot recognizing it at bios
- pvscan showed single volume group for CargoPlane
- fdisk showed extra 320GB with partitions for W95 Ext’d (LBA) and HPFS/NTFS on sde (sde1 and sde5)
- not sure why there are two and they look same size
Get data from remaining 320GB disk to RAID array
- Mount that beottch
root@lms:/dev# mkdir /media/transit2
root@lms:/dev# mount -t ntfs /dev/sde5 /media/transit2/
- sde and sde1 did not want to mount. Also, I read a lot about people having issues with dealing with files once mounted. I know i cant write with this version of ntfs, but ppl even had issues with reading and seeing the files. Hopefully I will be able to read em fine.
- went to /media/transit2/ dir and everything seems readable!! Actually, everything seems to have permissions of 777
- 222GB used on sde5 ‘transit2’ disk; alot of it is copies b/c there is a 123GB .tib backup file, and then a lot of directories for each C, D, F ‘drive
- did a df -h to see if i could fit all off transit2 drive onto raid. I could but itd be tighter than i feel comfortable.
Get rid of 320GB .img files
- I need to delete the 2x 320GB each .img files made by dd on the RAID-5
- rm lms_pata_320GB_sde.img
- rm lms_pata_320GB_sdf.img
Copy data
- cp -rv /media/transit2/ /media/documents/
- See if the directories are the same contents
diff -qr /media/transit2/ /media/documents/transit2/
- No differences!
Side Project: SSH Key authentication
- Simon taught me how to do ssh keypair generation and setup so that you can login without passwords and just keys, means more secure and easier for remote access
- general procedure documented at ssh_key_auth
- logged in as root
- edited ssh config file to not allow root logins, and to yes allow key logins; i kept password logins on though too
nano /etc/ssh/sshd_config
- PermitRootLogin no
- RSAAuthentication yes
- PubkeyAuthentication yes
- Restart ssh server
/etc/init.d/ssh reload
- Add public key from r2d2 at work, to authorized key file at lms
- Copy public key to lms home dir
scp ~/.ssh/id_rsa.pub nyeates1@yeates.dyndns.org:~/
- Add uoploaded file to authorized keys
cat id_rsa.pub >> /home/nyeates1/.ssh/authorized_keys
rm id_rsa.pub
- Now I can login from work computer r2d2 → home server lms without pass!
- ssh nyeates1@yeates.dyndns.org
Unplug 3x 1TB drives array, prep for reboot
This is for safety of the data on these drives. Make sure that the fstab wont care if its missing.
First though, get drive setup to be ready correctly.
- For some reason, transit2 was mounted, need it unmounted
- umount /media/transit2/
- Edited fstab to remove RAID array mount for time being
- nano /etc/fstab
- Comment out: #/dev/md0 /media/documents ext3 defaults 0 2
- Clean directories; these were formerly used for mounting to
- root@lms:/media# rmdir olddocuments/
- root@lms:/media# rmdir transit2/
Clear data, LVM, partition info on all 320GB disks
- Restart
- Saw with mount command that win xp backup drive was not mounted, not sure if it should be or not
- Also saw no md0 for RAID mounted
 the above change to fstab worked!
 - pvdisplay showed sdd and sdc as two drive in vol group ‘Media’
- fdisk -ls showed boot drive 10g, and 3x 320 gb, with sdb having windows partitions on it
fdisk /dev/sdb
- ‘m’ for help
- ‘d’ for delete
- ‘5’ for partition 5
- ‘d’ ‘1’ for delete other partition
- ‘w’ to write out! successfully altered
- fdisk -ls showed partitions gone!
- Now need to make sure that other 2 320GB disks have their volume group info off of them.
Arman came, got movies
Arman was visiting and had some good movies on a USB drive. I turned off, reconnected SATA drives, turned on, mounted, and copied movies over.
- nano /etc/fstab
- sudo mount -t ext3 /dev/md0 /media/documents/
- df -h showed 1% increase in usage on md0
- Gave device is busy when trying to unmount; probly because i copied so much new data onto the array that it is now propgating it?
sudo umount /dev/md0
umount: /media/documents: device is busy
- Shows mounts
cat /proc/mounts
- Does show md0
fuser -m /dev/md0
- shows processes being used by device
- it showed nothing, as now it had been a few minutes and the disk isnt being accessed
- umount command worked!
- shutdown, unplugged again
Create new RAID array on 3x 320GB disks
Follow notes from the first creation of RAID array. Very good documentation at: raid_filesystem_lvm
Which devices?
- ls /sys/block
- ls /dev/sd*
- fdisk -ls
- sdb, sdc, sdd all 1Tb drives
Put partitions on devices (drives)
- fdisk /dev/sdb (could also use n-curses ‘cfdisk /dev/sdb’)
- n new partition
- p primary partition
- part number: 1
- first cyl: <enter> (default is 1)
- last cyl: <enter> (default is max disk size)
- t change file system type (system id)
- fd linux raid auto
- w write and exit
- fdisk /dev/sdc
- fdisk /dev/sdd
See my drives and partitions!
- ls /dev/sd*
- fdisk -ls
Create array
- mdadm –verbose –create /dev/md1 –level=5 –raid-devices=3 /dev/sd[bcd]1
- ls /dev/md*
- cat /proc/mdstat
- mdadm -E /dev/sdb1
Notes
- reading up on mdadm command, what about –chunk= options for creation of an array? Is there something more optimal that I could put it at for my large-sized files?
- Answer: Yes, 128k. See http://linux-raid.osdl.org/index.php/RAID_setup#RAID-5_2
- Quote: “When creating an array with version-1 metadata a name for the host is required. If this is not given with the –name option, mdadm will chose a name based on the last component of the name of the device being created. So if /dev/md3 is being created, then the name 3 will be chosen. If /dev/md/home is being created, then the name home will be used.”
Output
root@lms:~# mdadm --verbose --create /dev/md1 --level=5 --raid-devices=3 /dev/sd[bcd]1
mdadm: layout defaults to left-symmetric
mdadm: chunk size defaults to 64K
mdadm: size set to 312568576K
mdadm: array /dev/md1 started.
root@lms:~# cat /proc/mdstat
Personalities : [linear] [raid6] [raid5] [raid4] [multipath] [faulty]
md1 : active raid5 sdd1[3] sdc1[1] sdb1[0]
      625137152 blocks level 5, 64k chunk, algorithm 2 [3/2] [UU_]
      [==>..................]  recovery = 10.2% (31882484/312568576) finish=108.9min speed=42941K/sec

unused devices: <none>
Create filesystem on RAID device
- mkfs.ext3 -v -m .1 -b 4096 -E stride=16,stripe-width=32 /dev/md1
- Calculations:
- chunk size = 64kB (set by default mdadm cmd, could modify)
- block size = 4kB (highest setting; reccomended for large files and most of time)
- stride = chunk / block = 64kB / 4k = 16kB
- stride-width = stride * ( (n disks in raid5) - 1 ) = 16kB * ( (3) - 1 ) = 16kB * 2 = 32kB
- Note: You would want to change the stride-width if you added disks to array.
- tune2fs -E stride=n,stripe-width=m /dev/mdx
Output
root@lms:/media/documents# mkfs.ext3 -v -m .1 -b 4096 -E stride=16,stripe-width=32 /dev/md1
mke2fs 1.40.8 (13-Mar-2008)
Filesystem label=
OS type: Linux
Block size=4096 (log=2)
Fragment size=4096 (log=2)
39075840 inodes, 156284288 blocks
0 blocks (0.00%) reserved for the super user
First data block=0
Maximum filesystem blocks=4294967296
4770 block groups
32768 blocks per group, 32768 fragments per group
8192 inodes per group
Superblock backups stored on blocks:
        32768, 98304, 163840, 229376, 294912, 819200, 884736, 1605632, 2654208,
        4096000, 7962624, 11239424, 20480000, 23887872, 71663616, 78675968,
        102400000

Writing inode tables: done
Creating journal (32768 blocks): done
Writing superblocks and filesystem accounting information: done

This filesystem will be automatically checked every 28 mounts or
180 days, whichever comes first.  Use tune2fs -c or -i to override.
Mount filesystem
- mkdir /media/test
- mount -t ext3 /dev/md1 /media/test/
Add to fstab file
- nano /etc/fstab
#raid5 mdadm TEST filesystem
/dev/md1         /media/test    ext3    defaults        0       2
Put some fake data on new RAID, come up with verification schema
need to mount it at /media/documents so that i can get stuff onto it through the share that is already setup with AFP.
- sudo umount /dev/md1
- sudo mount -t ext3 /dev/md1 /media/documents/
- Should be good to go. Need to remember to unmount from here and not remount other raid array while it is here.
- Tried to copy files and got error on mac: “The operation cannot be completed because you do not have sufficient write priveleges.”
Current ownership
nyeates1@lms:/media$ ls -la
total 24
drwxr-xr-x  6 root root 4096 2009-08-19 01:39 .
drwxr-xr-x 21 root root 4096 2008-09-27 15:43 ..
lrwxrwxrwx  1 root root    6 2008-08-22 20:04 cdrom -> cdrom0
drwxr-xr-x  2 root root 4096 2008-08-22 20:04 cdrom0
drwxr-xr-x  4 root root 4096 2009-08-19 12:37 documents
lrwxrwxrwx  1 root root    7 2008-08-22 20:04 floppy -> floppy0
drwxr-xr-x  2 root root 4096 2008-08-22 20:04 floppy0
-rw-r--r--  1 root root    0 2009-08-19 01:39 .hal-mtab
drwxr-xr-x  2 root root 4096 2009-08-19 00:06 test
nyeates1@lms:/media$ cd documents
nyeates1@lms:/media/documents$ ls -la
total 28
drwxr-xr-x 4 root root  4096 2009-08-19 12:37 .
drwxr-xr-x 6 root root  4096 2009-08-19 01:39 ..
drwxr-xr-x 2 root root  4096 2009-08-19 12:37 .AppleDB
drwx------ 2 root root 16384 2009-08-18 23:41 lost found
- sudo chown -Rv nyeates1:nyeates1 ./documents/
- Now I can copy files fine on mac mini! 3.07 GB in about 2 minutes!
MD5 Checksum / hash verification method
Started reading into ways to verify that the data is the same data each time i make changes to the hdd array, etc. MD5 is not found to be insecure for public applications, but I think that it reasonable for me to use on this private, trusted, simple environment.
Basically, you can get the md5 hash of a disk before, and after some change to the underlying structure, or a copy of the disk, and use md5 to compare their hashes. If even one bit is changed, it will show different.
md5sum /dev/md1 > /tmp/320gb-raid-original.md5
cksum /dev/md1 > /tmp/320gb-raid-original-dev-md1.crc
- md5sum is slow, didnt finish, could use sum or cksum or sha1sum?
- tried out sum, cksum and timed them:
root@lms:~# time sum /dev/md1
60173 625137152
real    111m46.343s
user    35m6.684s
sys     29m21.198s

root@lms:~# time cksum /dev/md1
735903248 640140443648 /dev/md1
real    114m37.638s
user    44m2.225s
sys     27m30.415s
- I think I trust the output of the more complex cksum, despite it taking slightly longer
cksum on data
- Realized that the first RAID test would likely invalidate the /dev/md1 cksum instantly. We would be adding a disk to the array and this would change contents of the device. Need to do checksum on data.
- After research, found that I cannot do cksum on directories directly, gotta make script to check each file
nyeates1@lms:/tmp/raidTests$ cat cksumScript.sh
find /media/test/ -type f -print | sort | while read FNAME
do
cksum "${FNAME}"
done
- now I can redirect output of this script to a file and diff the files
root@lms:/tmp/raidTests# sh cksumScript.sh > 320gb-raid-original-dir.crc
root@lms:/tmp/raidTests# sh cksumScript.sh > 320gb-raid-original-dir-compare.crc
root@lms:/tmp/raidTests# diff 320gb-raid-original.crc 320gb-raid-original-compare.crc
root@lms:/tmp/raidTests#
Found that restart gets rid of tmp directory
I had had raid test data in /tmp . This must be removed on reboot. Had to move it to my users home directory
I ran 2 sets of baseline cksum tests.
- 00-Original from start, no changes, has set of movie files on drive
- 01-Reboot I rebooted the machine, where md array was remounted, but files shouldnt be touched
- no difference in the diff’s
- there IS a difference in cksum of /dev/md1
 NO GOOD
ULTIMATE VERIFICATION CODE
Run this over and over after each RAID test
sh /home/nyeates1/raidTests/cksumScript.sh > /home/nyeates1/raidTests/320gb-raid-somename-dir.crc
cksum /dev/md1 > /home/nyeates1/raidTests/320gb-raid-somename-md1.crc
Run tests on 3x 320 GB RAID
See my list of RAID tests at: raid_test
Prep
- Need to get extra 320GB HDD from Best Buy: WD3200JB-00KFAO - Caviar SE
- Got a drive from BB 320GB WD3200AAKS - Sata - 16 MB cache - Caviar Blue
- Shutdown computer
- Physically installed sata drive to sata port 1
- booted up, saw it in bios
- sda is new sata drive, sdb is OS drive, sd[cde]1 are existing 320 GB drives, md1 is existing test raid device
- raid was recognized and setup despite sd* letters switching....cool!
grow
Add new drive
- fdisk /dev/sde
- n new partition
- p primary partition
- part number: 1
- first cyl: <enter> (default is 1)
- last cyl: <enter> (default is max disk size)
- t change file system type (system id)
- fd linux raid auto
- w write and exit
- umount /dev/md1
- Want to see layout of md disks:
root@lms:~# mdadm -E /dev/sd[bcd]1
/dev/sdb1:
          Magic : a92b4efc
        Version : 00.90.00
           UUID : 48c708ae:53236bb8:448213b5:08c3805a (local to host lms)mdadm --detail /dev/md
  Creation Time : Mon Aug 10 01:39:35 2009
     Raid Level : raid5
  Used Dev Size : 312568576 (298.09 GiB 320.07 GB)
     Array Size : 625137152 (596.18 GiB 640.14 GB)
   Raid Devices : 3
  Total Devices : 3
Preferred Minor : 1

    Update Time : Tue Sep  8 23:10:46 2009
          State : clean
 Active Devices : 3
Working Devices : 3
 Failed Devices : 0
  Spare Devices : 0
       Checksum : 3a2492f1 - correct
         Events : 0.8

         Layout : left-symmetric
     Chunk Size : 64K

      Number   Major   Minor   RaidDevice State
this     0       8       17        0      active sync   /dev/sdb1

   0     0       8       17        0      active sync   /dev/sdb1
   1     1       8       33        1      active sync   /dev/sdc1
   2     2       8       49        2      active sync   /dev/sdd1

/dev/sdc1:
Basically same as above

/dev/sdd1:
Basically same as above
mdadm --verbose --add /dev/md1 /dev/sde
- Adds the drive to the array (can be used as spare or to add space to live, etc)
- does not take much time to run
mdadm --verbose --grow /dev/md1 --raid-device=4
- Grows the arrays used space to use-live the new HDD
- command returns to prompt fast, but md must reshape (take a looooong time)
root@lms:~# cat /proc/mdstat
Personalities : [linear] [raid6] [raid5] [raid4] [multipath] [faulty]
md1 : active raid5 sde[3] sdb1[0] sdd1[2] sdc1[1]
      625137152 blocks super 0.91 level 5, 64k chunk, algorithm 2 [4/4] [UUUU]
      [>....................]  reshape =  1.7% (5586952/312568576) finish=699.6min speed=7310K/sec
- This took 6-8+ hours to finish, and it did successfully
- the /proc/mdstat file at the end not longer had the progress line
e2fsck -fv -C 0 /dev/md1check the file system (or use fsck.ext3)
- -C 0 print progress
- -f check even if file system seems clean
- -v verbose
- resulted in 0 bad files and no warnings
- fdisk did not show the file system on /dev/md1 not sure why it wouldnt???
resize2fs -p /dev/md1
resize the file system
- -p print progress
- seemed to work!
tune2fs -E stride=16,stripe-width=48 /dev/md1
retune for diff # of disks in raid
- unused devices: none</code>
- chunk size = 64kB (set by default mdadm cmd, could modify)
- block size = 4kB (highest setting; reccomended for large files and most of time)
- stride = chunk / block = 64kB / 4k = 16kB
- stride-width = stride * ( (n disks in raid5) - 1 ) = 16kB * ( (4) - 1 ) = 16kB * 3 = 48kB
- PS: man of tune2fs says n+1, but I do not think this is right. The number of data disks in raid5 is the number of disks minus the one that can error out (n-1).
- mount -t ext3 /dev/md1 /media/test/
- yay it mounted!
Test Chksum
- sh /home/nyeates1/raidTests/cksumScript.sh > /home/nyeates1/raidTests/02-320gb-raid-grow-dir.crc
- diff 02-320gb-raid-grow-dir.crc 01-320gb-raid-reboot-dir.crc
- No difference!
- SUCCESSFUL GROW
yank a device
- First I think that I will soft yank (with a command) and then maybe secondly do a hard yank (a cable while its live). For hard i would yank the best buy one that i gotta return soon.
- How do I tell which sd* is the best buy/sata one? fdisk -l shows that sde *might* be it. Hope im right!
Soft yank
- cat /etc/syslog.conf most log files are in /var/log/* and /var/log/syslog
- tail -f /var/log/syslog
- tail -f /proc/mdstat
- mdadm –manage –set-faulty /dev/md1 /dev/sde
- syslog output
Sep 12 13:55:51 lms kernel: [816246.172760] raid5: Disk failure on sde, disabling device.
Sep 12 13:55:51 lms kernel: [816246.172762] raid5: Operation continuing on 3 devices.
Sep 12 13:55:51 lms kernel: [816246.212012] RAID5 conf printout:
Sep 12 13:55:51 lms kernel: [816246.212012]  --- rd:4 wd:3
Sep 12 13:55:51 lms kernel: [816246.212012]  disk 0, o:1, dev:sdb1
Sep 12 13:55:51 lms kernel: [816246.212012]  disk 1, o:1, dev:sdc1
Sep 12 13:55:51 lms kernel: [816246.212012]  disk 2, o:1, dev:sdd1
Sep 12 13:55:51 lms kernel: [816246.212012]  disk 3, o:0, dev:sde
Sep 12 13:55:51 lms kernel: [816246.224013] RAID5 conf printout:
Sep 12 13:55:51 lms kernel: [816246.224016]  --- rd:4 wd:3
Sep 12 13:55:51 lms kernel: [816246.224018]  disk 0, o:1, dev:sdb1
Sep 12 13:55:51 lms kernel: [816246.224019]  disk 1, o:1, dev:sdc1
Sep 12 13:55:51 lms kernel: [816246.224021]  disk 2, o:1, dev:sdd1
Sep 12 13:55:51 lms mdadm: Fail event detected on md device /dev/md1, component device /dev/sde
Sep 12 13:55:51 lms postfix/pickup[22613]: 9DA27332A0: uid=0 from=<root>
Sep 12 13:55:51 lms postfix/cleanup[22666]: 9DA27332A0: message-id=<20090912175551.9DA27332A0@lms>
Sep 12 13:55:51 lms postfix/qmgr[5439]: 9DA27332A0: from=<root@lms>, size=790, nrcpt=1 (queue active)
Sep 12 13:55:54 lms postfix/smtp[22668]: 9DA27332A0: to=<nyeates1@umbc.edu>, relay=mxin.umbc.edu[130.85.12.6]:25, delay=2.5, delays=0.17/0.04/2.2/0.06, dsn=5.1.8, status=bounced (host mxin.umbc.edu[130.85.12.6] said: 553 5.1.8 <nyeates1@umbc.edu>... Domain of sender address root@lms does not exist (in reply to RCPT TO command))
Sep 12 13:55:54 lms postfix/cleanup[22666]: 0C19C332A1: message-id=<20090912175554.0C19C332A1@lms>
Sep 12 13:55:54 lms postfix/qmgr[5439]: 0C19C332A1: from=<>, size=2550, nrcpt=1 (queue active)
Sep 12 13:55:54 lms postfix/bounce[22669]: 9DA27332A0: sender non-delivery notification: 0C19C332A1
Sep 12 13:55:54 lms postfix/qmgr[5439]: 9DA27332A0: removed
Sep 12 13:55:54 lms postfix/local[22670]: 0C19C332A1: to=<nyeates1@lms>, orig_to=<root@lms>, relay=local, delay=0.08, delays=0.01/0.03/0/0.04, dsn=2.0.0, status=sent (delivered to maildir)
Sep 12 13:55:54 lms postfix/qmgr[5439]: 0C19C332A1: removed
- sh /home/nyeates1/raidTests/cksumScript.sh > /home/nyeates1/raidTests/03-320gb-raid-softYank-dir.crc
- diff /home/nyeates1/raidTests/03-320gb-raid-softYank-dir.crc /home/nyeates1/raidTests/01-320gb-raid-reboot-dir.crc
- No difference!
- SUCCESSFUL SOFT YANK
- Now its time to rebuild the array with the former drive! I will check the file contents during and after.
- mdadm /dev/md1 –remove /dev/sde
- from syslog when i ran the above:
Sep 13 01:27:11 lms kernel: [857726.412012] md: unbind<sde>
Sep 13 01:27:11 lms kernel: [857726.412012] md: export_rdev(sde)
- mdstat shows 3 disks now, not any fourth
- mdadm /dev/md1 –add /dev/sde
- syslog
Sep 13 01:57:35 lms kernel: [859550.700607] md: bind<sde>
Sep 13 01:57:35 lms kernel: [859550.728010] RAID5 conf printout:
Sep 13 01:57:35 lms kernel: [859550.728010]  --- rd:4 wd:3
Sep 13 01:57:35 lms kernel: [859550.728010]  disk 0, o:1, dev:sdb1
Sep 13 01:57:35 lms kernel: [859550.728010]  disk 1, o:1, dev:sdc1
Sep 13 01:57:35 lms kernel: [859550.728010]  disk 2, o:1, dev:sdd1
Sep 13 01:57:35 lms kernel: [859550.728010]  disk 3, o:1, dev:sde
Sep 13 01:57:35 lms mdadm: RebuildStarted event detected on md device /dev/md1
Sep 13 01:57:35 lms kernel: [859550.733244] md: recovery of RAID array md1
Sep 13 01:57:35 lms kernel: [859550.733248] md: minimum _guaranteed_  speed: 1000 KB/sec/disk.
Sep 13 01:57:35 lms kernel: [859550.733250] md: using maximum available idle IO bandwidth (but not more than 200000 KB/sec) for recovery.
Sep 13 01:57:35 lms kernel: [859550.733254] md: using 128k window, over a total of 312568576 blocks.
- mdstat shows the array rebuilding
Hard Yank
- tail -f /var/log/syslog
- tail -f /proc/mdstat
- Yanked the best buy sata drive; yanked the sub connector at the mobo end
- syslog
Sep 18 23:04:06 lms kernel: [1367541.472016] ata5: exception Emask 0x10 SAct 0x0 SErr 0x1810000 action 0xe frozen Sep 18 23:04:06 lms kernel: [1367541.472016] ata5: SError: { PHYRdyChg LinkSeq TrStaTrns } Sep 18 23:04:06 lms kernel: [1367541.472016] ata5: hard resetting link Sep 18 23:04:07 lms kernel: [1367542.224021] ata5: SATA link down (SStatus 0 SControl 300) Sep 18 23:04:07 lms kernel: [1367542.224029] ata5: failed to recover some devices, retrying in 5 secs Sep 18 23:04:12 lms kernel: [1367547.228020] ata5: hard resetting link Sep 18 23:04:12 lms kernel: [1367547.548019] ata5: SATA link down (SStatus 0 SControl 300) Sep 18 23:04:12 lms kernel: [1367547.548025] ata5: failed to recover some devices, retrying in 5 secs Sep 18 23:04:17 lms kernel: [1367552.552022] ata5: hard resetting link Sep 18 23:04:18 lms kernel: [1367552.872018] ata5: SATA link down (SStatus 0 SControl 300) Sep 18 23:04:18 lms kernel: [1367552.872024] ata5.00: disabled Sep 18 23:04:18 lms kernel: [1367553.376023] ata5: EH complete Sep 18 23:04:18 lms kernel: [1367553.376161] ata5.00: detaching (SCSI 4:0:0:0) Sep 18 23:04:18 lms kernel: [1367553.377378] sd 4:0:0:0: [sde] Synchronizing SCSI cache Sep 18 23:04:18 lms kernel: [1367553.377418] sd 4:0:0:0: [sde] Result: hostbyte=DID_BAD_TARGET driverbyte=DRIVER_OK,SUGGEST_OK Sep 18 23:04:18 lms kernel: [1367553.377421] sd 4:0:0:0: [sde] Stopping disk Sep 18 23:04:18 lms kernel: [1367553.377430] sd 4:0:0:0: [sde] START_STOP FAILED Sep 18 23:04:18 lms kernel: [1367553.377432] sd 4:0:0:0: [sde] Result: hostbyte=DID_BAD_TARGET driverbyte=DRIVER_OK,SUGGEST_OK Sep 18 23:04:18 lms NetworkManager: <debug> [1253329458.633024] nm_hal_device_removed(): Device removed (hal udi is '/org/freedesktop/Hal/devices/pci_10de_55_scsi_host_scsi_device_lun0_scsi_generic'). Sep 18 23:04:18 lms NetworkManager: <debug> [1253329458.644806] nm_hal_device_removed(): Device removed (hal udi is '/org/freedesktop/Hal/devices/storage_serial_1ATA_WDC_WD3200AAKS_00L9A0_WD_WMAV2A404686'). Sep 18 23:04:18 lms NetworkManager: <debug> [1253329458.649343] nm_hal_device_removed(): Device removed (hal udi is '/org/freedesktop/Hal/devices/pci_10de_55_scsi_host_scsi_device_lun0'). Sep 18 23:04:18 lms NetworkManager: <debug> [1253329458.652641] nm_hal_device_removed(): Device removed (hal udi is '/org/freedesktop/Hal/devices/pci_10de_55_scsi_host'). Sep 18 23:04:18 lms NetworkManager: <debug> [1253329458.660932] nm_hal_device_removed(): Device removed (hal udi is '/org/freedesktop/Hal/devices/volume_part1_size_320070288384'). ... Sep 18 23:07:53 lms kernel: [1367768.736010] raid5: Disk failure on sde, disabling device. Sep 18 23:07:53 lms kernel: [1367768.736010] raid5: Operation continuing on 3 devices. Sep 18 23:07:54 lms kernel: [1367768.773247] RAID5 conf printout: Sep 18 23:07:54 lms kernel: [1367768.773250] --- rd:4 wd:3 Sep 18 23:07:54 lms kernel: [1367768.773252] disk 0, o:1, dev:sdb1 Sep 18 23:07:54 lms kernel: [1367768.773253] disk 1, o:1, dev:sdc1 Sep 18 23:07:54 lms kernel: [1367768.773255] disk 2, o:1, dev:sdd1 Sep 18 23:07:54 lms kernel: [1367768.773256] disk 3, o:0, dev:sde Sep 18 23:07:54 lms kernel: [1367768.784300] RAID5 conf printout: Sep 18 23:07:54 lms kernel: [1367768.784304] --- rd:4 wd:3 Sep 18 23:07:54 lms kernel: [1367768.784305] disk 0, o:1, dev:sdb1 Sep 18 23:07:54 lms kernel: [1367768.784306] disk 1, o:1, dev:sdc1 Sep 18 23:07:54 lms kernel: [1367768.784308] disk 2, o:1, dev:sdd1 ... Sep 18 23:07:54 lms mdadm: Fail event detected on md device /dev/md1, component device /dev/sde - /proc/mdstat shows 3 drives and one failed (F)
Personalities : [linear] [raid6] [raid5] [raid4] [multipath] [faulty] md1 : active raid5 sde[4](F) sdb1[0] sdd1[2] sdc1[1] 937705728 blocks level 5, 64k chunk, algorithm 2 [4/3] [UUU_] unused devices: <none> - sh /home/nyeates1/raidTests/cksumScript.sh > /home/nyeates1/raidTests/05-320gb-raid-hardYank-dir.crc
- diff /home/nyeates1/raidTests/05-320gb-raid-hardYank-dir.crc /home/nyeates1/raidTests/01-320gb-raid-reboot-dir.crc
- No difference!
- SUCCESSFUL HARD YANK
- Now I need to try to get the drive back online again.
- In real life, I would never
fuck a horseplug a HDD back in while hot (im no reverse-hot-plug cowboy!), so I will turn off entire machine, plug HDD in, and startup again - When i monitored syslog on shutdown, a ton of snort messages were displayed; like standard review-on-shutdown messages, nothing alarming. It reminded me that SNORT is still installed!
- Started up fine with array in place
- Found it intersting that when i ran fdisk -ls that the disk that was yanked, doesnt show any partition info; Says that it doesnt contain a valid part table
- mdadm /dev/md1 –add /dev/sda
- looks to have worked as /proc/mdstat is back to normal
- sh /home/nyeates1/raidTests/cksumScript.sh > /home/nyeates1/raidTests/06-320gb-raid-afterHardYank-dir.crc
- diff /home/nyeates1/raidTests/06-320gb-raid-afterHardYank-dir.crc /home/nyeates1/raidTests/01-320gb-raid-reboot-dir.crc
- SUCCESSFUL RECOVER!!!
Returned 4th HDD
Had to return it to best buy now, so i turned off machine and yanked it.
Battery died
Unrelated, the battery died for the UPS power system connected to the server. I ordered a new battery finally and got it up and running in no time. Server is as it was, battery working fine. ~10/15/09
Also of note is that it did a disk check (fschk ??) on the first boot up from power off. I was looking for boot logs and I think I learned that ubuntu has a bug of not outputing boot data to a log (WTF?!). I think the file systems checked out ok.
Question: How do I really know if my file systems or drives are starting to go bad?
State machine is in now
I think the machine still thinks there are 4 drives in the RAID array, and that only 3 are operating. This is for the test array, which doesnt matter as much now. I think I should next try to bring the fs down to size, and then bring the array down to 3 drives and right size, etc. Then I can unplug the shits.
Shrink
From man page for resize2fs: " If you wish to shrink an ext2 partition, first use resize2fs to shrink the size of filesystem. Then you may use fdisk(8) to shrink the size of the partition. When shrinking the size of the partition, make sure you do not make it smaller than the new size of the ext2 filesystem!”
- Want to see layout of md disks:
root@lms:~# mdadm -E /dev/sd[bcd]1
/dev/sdb1:
          Magic : a92b4efc
        Version : 00.90.00
           UUID : 48c708ae:53236bb8:448213b5:08c3805a (local to host lms)
  Creation Time : Mon Aug 10 01:39:35 2009
     Raid Level : raid5
  Used Dev Size : 312568576 (298.09 GiB 320.07 GB)
     Array Size : 937705728 (894.27 GiB 960.21 GB)
   Raid Devices : 4
  Total Devices : 3
Preferred Minor : 1

    Update Time : Sat Oct 31 07:56:14 2009
          State : clean
 Active Devices : 3
Working Devices : 3
 Failed Devices : 1
  Spare Devices : 0
       Checksum : 3a6ff60e - correct
         Events : 0.208122

         Layout : left-symmetric
     Chunk Size : 64K

      Number   Major   Minor   RaidDevice State
this     0       8       17        0      active sync   /dev/sdb1

   0     0       8       17        0      active sync   /dev/sdb1
   1     1       8       33        1      active sync   /dev/sdc1
   2     2       8       49        2      active sync   /dev/sdd1
   3     3       0        0        3      faulty removed

/dev/sdc1:
Basically same as above

/dev/sdd1:
Basically same as above
- Note that the setup thinks it should have 4 disks, but it only has 3 active.
- I need to get it down to 3 total and 3 active.
- umount /dev/md1
- fdisk doesnt show partition info; still not sure why
- e2fsck -fv -C 0 /dev/md1
- check the file system (or use fsck.ext3)
- -C 0 print progress
- -f check even if file system seems clean
- -v verbose
- resulted in 0 bad files and no warnings
- ran in <8 mins
- resize2fs -S 128 -p /dev/md1 630G
- -S raid stride size calculated with chunk / block = 512k / 4k = 128k
- remember to set chunk in mdadm command, as chunk is set to 64? by default
- higher chunk was decided upon based on info from raid wiki that reasearch showed that high chunk size for raid-5 arrays worked good
- 630G gigabyes shrink to size was decided because i do not know the exact size of the former 3 disk filesystem.
- The disks add up to 640GB. I can make it at 630 GB filesystem, well below the 640 limit. Later, I could resize the fs to the limit of the 3 drives
- i can only do this as long as there is enough free space in the File system
- ran in ~8 mins
fdisk /dev/md1- I dont think I need to run this. When I originally grew this disk set, I ran it on the one specific new disk, so that it was fd linux raid auto fs type and it would be recognized by the mdadm commands. Now though, fdisk cant see the md1 array so I think mdadm will take care of the ‘partition’ size
- Not so sure how to remove excess drive. Ran the following code:
root@lms:~# mdadm --verbose --remove detached /dev/md1
mdadm: error opening detached: No such file or directory
root@lms:~# mdadm --verbose --remove failed /dev/md1
mdadm: error opening failed: No such file or directory
root@lms:~# mdadm --verbose --remove /dev/md1
- mdadm –verbose –grow /dev/md1 –size=208379050
- mdadm –verbose –grow /dev/md1 raid-device=3
- This command wont run
Delete array
- At this point I did a lot of research and found from Neil, the maker of mdadm, that a shrinking to less devices is not currently supported
- I think that because this md set is set to 4 disks, it is using all 3 disks right now for space. It is in a degraded state I think. If one disk goes down, you lose all data. I cant make it smaller, so I might as well clean the disks off and not use em. It was just test data anyway. Goodbye
- mdadm –manage –stop /dev/md1
- fdisk /dev/sdb1
- n new partition
- p primary partition
- part number: 1
- first cyl: <enter> (default is 1)
- last cyl: <enter> (default is max disk size)
- t change file system type (system id)
- 83 linux
- w write and exit
- fdisk for sdc1 sdd1 also
- REBOOT!
- Got errors at bootup that caused boot to pause and not boot to prompt. They were about md1 missing. A forum post mentioned that it was hard for ubuntu to forget about former md arrays
- looked into /var/log/dmesg:
[   19.177553] md: bind<sdc1>
[   19.177721] md: bind<sdd1>
[   19.177882] md: bind<sdb1>
[   19.198859] raid5: device sdb1 operational as raid disk 0
[   19.198862] raid5: device sdd1 operational as raid disk 2
[   19.198865] raid5: device sdc1 operational as raid disk 1
[   19.202247] input: Power Button (FF) as /class/input/input3
[   19.223305] raid5: allocated 4274kB for md1
[   19.223308] raid5: raid level 5 set md1 active with 3 out of 4 devices, algorithm 2
[   19.223311] RAID5 conf printout:
[   19.223313]  --- rd:4 wd:3
[   19.223315]  disk 0, o:1, dev:sdb1
[   19.223316]  disk 1, o:1, dev:sdc1
[   19.223318]  disk 2, o:1, dev:sdd1
[  731.742440] EXT3-fs error (device md1): ext3_check_descriptors: Block bitmap for group 1920 not in group (block 0)!
[  731.770839] EXT3-fs: group descriptors corrupted!
- edit /etc/default/bootlogd to yes to enable boot logging
- above did not allow /var/log/boot

- commented out reference to md1 in /etc/fstab, rebooted,
- THIS WORKED! rebooted with no errors or stops
RE-PREP md0 original array
- Unplugged old array PATA drives
- Plugged in SATA drives
- commented back IN md0 array in /etc/fstab, rebooted
- on bootup, doing fsck
- to get results from ongoing boot messages and fsck:
ctrl + alt + F2 AND ctrl + alt + F8
- fsck took a really long time; I came back ~12 hrs later and the system is in a locked state; fsck seems like its still running when I see some of its results in ctrl+alt+F8, but the disk is stopped; I could be wrong on if fsck finished tho too, as the last statement is like a summary statement;
- I hit ctrl+alt+del and bootup continued
- two things in boot up scrolled by as soon as i hit that sayiing something about 2 daemons errored out; rcS and rc6??
- boot continued to graphical boot
- I hit ctrl+alt+f2 to get to cli and logged in that way to see if the md0 array was online
- /proc/mdstat shows md0 as there but hard to tell if array is active
- mount does not show it mounted
- /etc/fstab shows its option in the file as on; all I can think is that it crashed somehow on boot; need to reboot?
- Seemed to start better on boot; looked clean, did it fast
- logged in again through c+a+f2
- mount shows md0 mounted yay!
- ls /media/documents shows drive contents... ARRAY WORKS!
- I want to manually rereun fsck to make sure its ok
- umount /dev/md0
- fsck -CV /dev/md0
- came back really quick and said
/dev/md0: clean, 122820/122101760 files, 276659314/488379968 blocks
Clean out RAID, get rid of cruft
- changed ownership on all files and dirs in /media/documents to nyeates1
- transit2 and lost and found had root ownership priorly
Delete dd-created .img files from RAID
Also, how does RAID handle large deletes? Fine? Does it need a defragment of somekind? Anyway to easily check for file system corruption?
New Stable OS Setup
Current OS is getting bloated with installing stuff hodge-podge. Need to start from scratch and get just what I need on it. Keep security in mind.
List of packages I know I will want/need
Setup Time Machine
- mkdir /media/documents/Backups/TimeMachineSue
- sudo nano /etc/netatalk/AppleVolumes.default
- /media/documents/Backups/TimeMachineSue TimeMachineSue allow:nyeates1 cnidscheme:cdb options:usedots,upriv
- sudo /etc/init.d/netatalk restart
- tried to start backup on sues computer...we had to set her computers variable in timemachine (through terminal only) to allow network backups
- defaults write com.apple.systempreferences TMShowUnsupportedNetworkVolumes 1
- it worked until it tried to create a volume on the share...it eventualy errored out
- this error went along with description on the webpage for afp setup
- mkdir /media/documents/Backups/TimeMachine
- sudo nano /etc/netatalk/AppleVolumes.default
- changed above line to TimeMachine
- sudo /etc/init.d/netatalk restart
- rm -r TimeMachineSue/
- tested making time machine backup from NicksMacBook
- didnt work same way as sues, so i went on implementing instructions on above website for this
- created sparsebundle image on desktop and copied it to my timemachine network volume
- time machine was “smart” and saw the sparsebundle and created another one called “NicksMacBook 1.tmp.sparsebundle”
- removed upriv options from /etc/netatalk/AppleVolumes.default
- sudo /etc/init.d/netatalk restart
- noticed that others in comments had same issues on snow leopard (SL), and that I need to try another method
- changed it back to upriv once again and restarted service
- also accidently added space between upriv and usedots. changed that to no space
- also noted earlier that notes in the console log of my mac refered to one of the network shares as -1, as if there were multiple of the shares
- i restarted comptuer for this to hopefully go away
- it didnt, but all worked...
- The key:
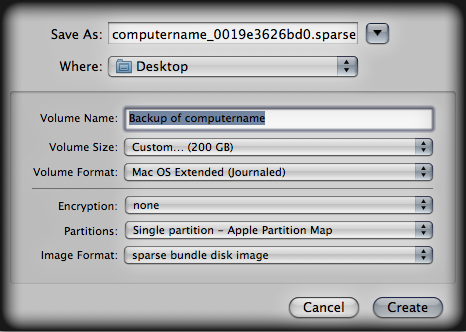
- follow directions for making your own sparsebundle on the webpage (with disk util)
- naming the file correctly is key
- TM tries to create [computername].sparsebundle, but actually still wants
[computername]_[en0 MAC].sparsebundle
- Pre-create the sparse bundle image on local computer and copy to backup. Here are settings for Disk Image Utility:

Monitor RAID-5
Via built-in mdadm Manage Mode
You should have mdadm report if any errors happen. This can be done by adding a MAILADDR line in /etc/mdadm.conf
echo "MAILADDR root" >> /etc/mdadm.conf
Or you could use an email address for the notification instead of root.
Start monitoring the raids eg by:
mdadm --monitor --scan --daemonise
Test that email notification is done by
mdadm --monitor --scan --test
With Zenoss
Test
Remote Backup
I want to backup some of the irreplacable data, to a separate location. In case of disaster, fire, server meltdown, I at least have those most important files. Likely use Rsync and cron. Take bandwidth into consideration if necessary.
Possibility to use tahoe fs and GridBackup as a backup medium for a friendnet. Hadoop and HDFS are possibilities too. ZFS is out of the running.
CrashPlan
Found out that this service is not just cloud-based only but allows backup amongst computers for free and it runs on linux and mac and win. I could use this to backup to other locations like Rolands or my parents.
Installed CrashPlan and got following post-install info:
CrashPlan has been installed and the Service has been started automatically.

Press Enter to complete installation.

Important directories:
  Installation:
    /usr/local/crashplan
  Logs:
    /usr/local/crashplan/log
  Default archive location:
    /media/documents/Backups/CrashPlanBackups

Start Scripts:
  sudo /usr/local/crashplan/bin/CrashPlanEngine start|stop
  /usr/local/crashplan/bin/CrashPlanDesktop

You can run the CrashPlan Desktop UI locally as your own user or connect
a remote Desktop UI to this Service via port-forwarding and manage it
remotely. Instructions for remote management are in the readme files
placed in your installation directory:
  /usr/local/crashplan/doc
RIP: LMS - Server Died
Sometime in Spring or Summer of 2011, the lms servers hardware died. I tried many things to try to get it responsive. I think it was the motherboard that died, as it wouldnt even post or beep. Nothing. CMOS Battery removal didnt do anything.
I determined that to continue, I would need a replacement motherboard with same model, or to start on a whole new machine. Replacement Mobos were a bit expensive. I actually am thinking that I want to move off of the lms server and onto the mac mini so that it makes it easier and more integrated. This means that I do not want to spend too much money fixing this so that I can then immediately move to a different solution.
New Server
I ended up getting a new HP mini tower computer from my dads work. It did not have 3 SATA ports. I bought a decent Promise SATA card online for like 50 or 60 bucks. I installed the card and then didnt touch the machine for months.
Now at end of Oct, I have finally got the new machine hooked up and running in Bellas room. I had to try a few different hard drives on the main OS one to assure that it was a quite one. It was the large 320 GB HDD.
New OS install
Put Ubuntu 11.10 on a USB stick (they have an awesome site and UX now! and the previews of their OS looks nice!) Also other have told me that it has improved much. They were right! I installed form the usb stick fine onto the 320 GB disk.
Initial Server Setup
I immediately updated all advised updates in the UI. Took maybe 12 mins.
I got openssh running on it with
sudo apt-get install openssh-server
I used the GUI-based disk util to see the various disks. All 3x 1TB disks show. I also looked at their SMART status. All disks good except one. WARNING: One of the 1TB drives has had some bad sectors.
Raid startup
I want to get the raid array up and going asap.
Following notes at http://nickyeates.com/technology/unix/raid_filesystem_lvm I found that I had to install mdadm:
apt-get install mdadm
It went into a curses mode to install Postfix, the mail transport agent. I told it:
- Internet-based email
- lms.loc (changing /etc/mailname to lms.loc)
Started up existing raid array:
mdadm --verbose --assemble /dev/md0 /dev/sd[bcd]1

mdadm: looking for devices for /dev/md0
mdadm: /dev/sdb1 is identified as a member of /dev/md0, slot 1.
mdadm: /dev/sdc1 is identified as a member of /dev/md0, slot 2.
mdadm: /dev/sdd1 is identified as a member of /dev/md0, slot 0.
mdadm: added /dev/sdb1 to /dev/md0 as 1
mdadm: added /dev/sdc1 to /dev/md0 as 2
mdadm: added /dev/sdd1 to /dev/md0 as 0
mdadm: /dev/md0 has been started with 3 drives.
Looks good:
cat /proc/mdstat

md0 : active raid5 sdd1[0] sdc1[2] sdb1[1]
      1953519872 blocks level 5, 64k chunk, algorithm 2 [3/3] [UUU]
Mounted the raid array:
mkdir /media/documents
mount -t ext3 /dev/md0 /media/documents/
Edited /etc/fstab:
# raid5 mdadm filesystem
/dev/md0        /media/documents ext3   defaults        0       2
Went into mounted dir and its all there! Yay!
Got AFP and Bonjour equivalents running
See above section that I updated on this
Dubugging dir list slowness
In using the AFP shares on mac mini for movies with plex media server, I noticed that the directory listing was molasses slow. Also, the entire ‘movies’ dir wouldnt load at all after some time.
I started digging into log files and people with similar problems.
Error log for Netatalk, the AFP daemon:
tail -f /media/documents/.AppleDB/db_errlog
This file was giving same error over and over:
cnid2.db/cnid2.db: DB_SECONDARY_BAD: Secondary index inconsistent with primary
Finding last valid log LSN: file: 2 offset 7783453
Recovery starting from [2][7782965]
Recovery complete at Tue Mar  6 17:17:04 2012
Maximum transaction ID 80000004 Recovery checkpoint [2][7783453]
Users here had similar issues and they basically were deleting their entire CNID databases (the database that keeps track of IDs → file names. They were then restarting. Another set of information under the official Netatalk docs explained about this CNID db and how it operates, what its role is, and about a new command:
dbd -s .
The -s scans. -r rebuilds what the scan finds.
I decided I would move the /media/documents/.AppleDB dir (same as deleting it), and rebuild.
I shutdown netatalk moved .AppleDB ran a cnid rebuild
dbd -r /media/documents/
The above command started checking and writing new CNIDs for every single file. Tons of lines flew by, one for each file it seemed.
45 mins of CNID rewrites, and it stops. I now start up netatalk. Logs and db seem to clear out from new.
Initial directory loads take a bit of time still, but once they are loaded, they are cached and fast.
Move data to Mac Mini Server
I want to get all of the data on this linux server over to a mac server, held on our current mac mini that will come from the living room. Now that we have 2 apple TV devices, we dont need the mac mini as a TV device in living room, freeing it for server use. My hope is that 1) I dont have to mess with such low level stuff and piecing together 10 open source components when setting up hard drives and file shares and bonjour, etc 2) So that Sue can more easily modify or restart or understand the data on this server.
Plan
Purchased a 3 TB HDD, and a USB enclosure that can take 4 drives.
- Plug this enclosure in, with the 3TB drive in it, into the Linux Media Server.
- Format and mount the 3 TB drive on LMS, now we have the 2 TB raid and 3 TB hdd
- Copy the files over to 3 TB hdd
- check that copy is correct
- Install mac mini and get server edition running on it (cheap app store purchase)
- Bring 3TB hdd over to mac mini (via usb enclosure), mount it,
- check that files show
- check that streaming is fast enough
- Start Backblaze backup immediately
- Unplug 3 x 1TB drives from LMS, slide them into USB enclosure on mac mini
- Format the 3 x 1TB drives into a mac raid-jbod (just a bunch of disks)
- there is no fault tolerance here, but i will setup a backup solution via backblaze or the likes
- Copy the files from 3 TB hdd to 3 x 1 TB raid-jbod
- Format the 3 TB hdd on mac mini
- Add the 3 TB hdd into the raid-jbod array, to create a 6TB JBOD array
- Install menu-bar utility that allowed SMART monitoring status and emails
Format and Mount 3 TB as UDF
Read an article that I should try UDF file system, so that when I take it to the mac, it can still be read natively. Ubuntu/linux also can format it. Little did I know, there was a bit of researched needed to format and mount it on linux.
Turns out UDF does not use normal MBR (master boot record) at the begining of the disk. It does its own thing, and you just gobble up the entire disk. So I messed with partitions at first, without knowing I didnt need to. Instead, it is good to first clear the MBR at the start of the disk, and then format with udftools on ubuntu. See commands below.
sudo dd if=/dev/zero of=/dev/sde bs=512 count=1 sudo mkudffs –media-type=hd –blocksize=512 /dev/sde
Got the info from here:
When I look at the drive capacity though, with `df -h` it says the drives size is 747G. Not 3 TB ![]()
I could still test the 3TB UDF drive on the mac mini to see if it mounts and has files on it.